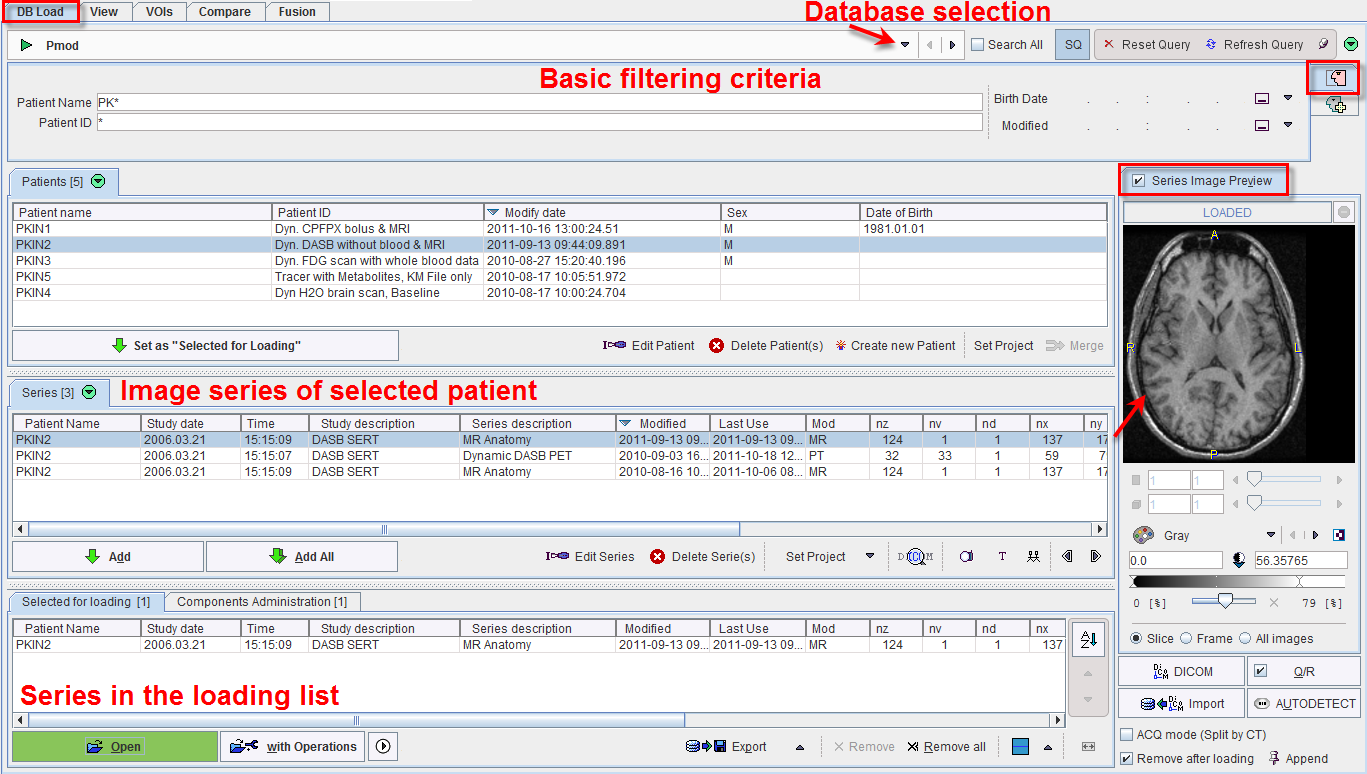
The DB Load page appears only if the use of the database within PMOD has been enabled by checking the box Use database (General Activation) in the global Config pane. The summary below explains the database loading interface. Note that when loading multiple series at once, the first series in the Selected for loading list becomes the Reference, while all subsequent series become the Reslice studies.

Summary of Image Loading from the Database
When loading images from the database the interface shown below allows searching for studies according to different criteria such as patient demographics, study date, modality, a project name or diagnosis. There is a basic filtering mode as illustrated bellow, and an advanced filtering mode illustrated later.

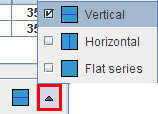
The layout can be organized vertically (as illustrated above), or horizontally with the Series tab stacked behind the Patients tab. This may be an advantage if patients tend to have many image series. The layout is switched by the option button

The Flat series is another arrangement which lists all image series in a single list.
Loading Overview
The uppermost section represents the filtering options. The use of filtering is recommended in large databases, because it substantially reduces the response time. Below the filters, the list of Patients is shown which match the current selection criteria. When one of these patients is selected, his image series available in the database are updated in the Series list section.
One or several image series can be selected and brought into the Selected for loading area by the Add button or by a double-click at the series entry. On the right side there is a preview window to verify the image contents before actually loading the whole data set. If the Series Image preview box is checked, an image is displayed as soon as a series is selected.
Finally, by activating the Open button, all series in the Selected for loading area are loaded into the PMOD tool. Append pushpin button is important for the outcome of the loading operation: with the appending setting ![]() the images are added, while with the overwriting setting
the images are added, while with the overwriting setting  any already loaded images will be discarded.
Note that multi-series selection depends on the context. If only a single series is expected by the program, double-clicking at the series will immediately start image loading.
User Interface Elements for Filtering
First of all the database to be searched must be selected with the selection in uppermost section, Pmod in the example above. The basic filtering options include the following elements.
Name |
Patient name, starting with the last name. The wildcard * can be used as a replacement for arbitrary sub-strings. |
Patient ID |
The patient ID filter, also supporting wildcards. |
Birth Date |
The filters for the birth date include an exact date, or a date range available from the selection list. |
Modified |
A date/time is maintained in the database recording when the data of the patients was modified the last time by adding an image series or by changing the patient information. For example, setting the field to Last Week only shows patients modified in the last seven days. |
SQ |
Means Save Query. If this button is enabled, the same filter settings will be applied when the database window is opened again. |
|
This button resets the filter settings by removing all specifications. |
|
The refresh button to apply the query to the database potentially updated in the meantime, or after changing the filter and disabled automatic refreshing. |
|
Toggle button to enable/disable automatic refreshing after changing a filter element |
There is an extended filtering capability available on the second sub-tab which is illustrated below.

It contains several new elements:
Study |
Filtering of text appearing in the study description. The * wildcard is supported. |
Series |
Filtering of text appearing in the series description. The * wildcard is supported. |
ALL DATA TYPES |
This selection lists all available data types in PMOD such as images, VOIs, etc. Setting this field to VOI Templates for example will only list patients who have a VOI definition attached to one of the image series.
|
Last Use |
A date/time is maintained in the database when data of the patients was accessed the last time. This information is listed for each database object. Selecting a date range allows browsing the database content based on a least recently used criterion. |
nz |
Filter to search for studies with a certain number of slices, including the criteria |
nv |
Filter to search for studies with a certain number of dynamic frames. For instance nv > 1 will only list dynamic series. |
Locked |
If the box is checked, only patients who have a Locked flag are listed. |
Modality |
A selection to restrict the search to a specific modality, e.g. to PT (PET) as in the example. Multiple modalities can be searched for at once. |
Prj |
Patients can be assigned to a Project. The selection allows choosing from the list of available project names. |
Dgn |
Similarly, patients can be given a Diagnosis. The selection allows choosing from the list of available diagnosis names. |
|
Every time data is saved in the database, the PMOD name of the user who saved is recorded together with the data. This button allows restricting the search to the PMOD user currently logged in (button out), or to show data of all users (button in). |
The green button  allows hiding the filter section. Upon activation the filter area collapses and the button appearance changes
  . This new button allows showing the hidden filtering settings.
Patient Operations
When a patient has been selected from the list, a row of buttons becomes active.
Set as |
Moves all series of the patient to the Selected for loading area. |
Edit |
Opens a dialog window for editing the patient demographic data. |
Set Project |
Allows defining three attributes for a patient: |
Delete |
Delete the patients selected in the list. |
Create new |
Create a new patient in the database, to whom information can be attached if there is no image series in the database. |
Merge |
Sometimes several entries are created for a single patient because of a mismatch in the name/ID information. To merge such entries, select all of them in the Patients list (with CTRL+Click) and activate the Merge button. As a result all series end up under a single patient entry. |
The  /
/  buttons allow hiding/showing the patient list controls.
Series Operations
When a series of the current patient is selected, the row of buttons below the list becomes active.
Add |
Moves the selected series of the patient to the Selected for loading area. |
Add All |
Moves all series of the patient to the Selected for loading area. |
Edit Series |
Opens a dialog window for editing the series information
|
Set Project |
Brings up the same dialog window as on the patient level to define project, diagnosis and locking on the series level. |
Pair Images |
This option in the selection list serves for associating two (or more) series. This association is used in processing tools which require the information of two image series. |
Pair VOIs |
This option in the selection list allows associating a VOI file to image series. |
Delete |
Delete the series selected in the list. |
DICOM |
Inspect the attributes of the selected series in a DICOM browser. |
|
Search JPEG or TIFF captures stored in the database. They can be opened in a viewer. |
|
Comment editor. Allows creating a comment for the selected image series. Existing comments can be edited or read. |
|
Search for a study which is associated to the selected series. |
|
Buttons allowing to step from patient to patient |
The  /
/  buttons allow hiding/showing the series list controls.
Selected for Loading Area
In most situations more than one series (from the same or different patients) can be added to the loading area, but there are exceptions when only a single series is allowed. The order in the list is relevant for the loading order. This is most important for the fusion tool because the first series will serve as the reference. To change the sorting order just click one of the column headers.
As soon as there are series in this area, the row of buttons below the list becomes active.
Open |
Starts loading the image series directly. The images are loaded without intervening dialog, and without any operations. Otherwise the dialog for specifying pre-processing options is shown. If the Append flag is on ( |
with Operations |
Starts loading the image series. The dialog for specifying pre-processing options is shown. If the Append flag is on ( |
|
This button serves for loading the selected data with a macro. |
Replicate |
Copy the selected series including components to another database which can be selected in the appearing dialog window. |
Export |
Export the series in the list from the database to a directory located on the fyle system or directly to an FTP node. The export dialog window |
C-Store |
This button allows sending the selected series directly to a DICOM server without first loading them into an image area. This has the advantage that no modifications are done to the original DICOM objects. In contrast, when loading the images and sending them to a DICOM server, some changes are applied to the DICOM attributes. |
Remove |
Removes the selected series from the selected for loading area, but does not delete from the database. |
Remove All |
Clears the Selected for loading area. |
|
This button allows setting defaults column order and width. |
|
This button allows sorting the images Selected for loading by the selected column. |
|
This buttons allow changing the images order in the list. |
DICOM Query/Retrieve
Q/R |
This button underneath the image display area starts the dialog window for the DICOM Query/Retrieve functionality. If the box left to Q/R is checked the demographic patient information is copied to the Q/R dialog window. |
Loading Images from the File System
AUTODETECT |
This button allows loading image data from outside the database. Basically, it is an Autodetect loading, so the user can just browse to any directory and select any type of image file. PMOD will detect its file format and perform the image loading operation, if possible. |
DICOM |
This button serves loading DICOM part 10 images. The difference with the Autodetect loading is that the user has to select a directory, not a file. |
Import |
This buttons allows direct importing of Dicom files to the current database. |